I have been shooting 360 panoramas since 2008. I'm here to teach you what I've learned.
See some of My 360 panoramasdisclaimer: The Nodal Ninja product links in this article are affiliate links, meaning when you click on them and make a purchase I get a small commission. The products that I recommend are ones that I have already used. If the link is not from Nodal Ninja then I am just sharing it for information purposes and I will not get anything out of it.
So if you find this website useful please purchase using the links below. This will help support the website and keep it free.
Also the accessories I recommend are for Canon because I use a Canon DSLR, if you have a different camera let's say Nikon then look for the equivalent for that. The Lens, wireless shutter trigger, etc., are different per Camera brand.
Thanks and happy learning!
My name is Milo Timbol, I live in the Philippines. I'm a software engineer specializing in UI, UX, SEO and of course 360 photography. I discovered 360 panoramas back in 2008 and it has become my passion ever since. Through the years I've put up many businesses that make us of 360 photos luckily 2 have survived :) one is a 360 virtual tour service provider called ExSight 360 Media Productions and the other is an online Wedding Marketplace which showcases wedding venues using 360 photography called Bride Worthy.
If you have any questions or just wish to network you can contact me via Facebook, Linkedin

What is 360 Photography?
360 Photography is a technique of photography where you use specialized equipment to capture the entire surrounding of a location instead of just one angle. There are many terms used to refer to this type of photography. It is often called 360 panoramic photography, VR (virtual reality photography), 360 virtual tours, 360 spherical photography, and more recently photosphere ( a term made popular by google because of the android app they created).
There is also another type of 360 photography where an object spins around an axis showing the whole item. This is called Object VR, or 360 product photography, It is also often referred to as 360 photography. Even though I also know how to create this type of interactive photo (see a sample we made for Mitsubishi - Mitsubishi Strada 2019) I will not talk about it here. I will be talking about the other type which focuses on places, landscape, rooms, etc.
How to make 360 Photos?
A 360 panoramic image consist of several images that are joined together using stitching software. Anyone can create a 360 photo ith the right equipment. There are several ways you can do it. You can use a DSLR, point and shoot camera, smart phone, array of cameras, and one shot solutions. I have tried many of them, wasted money on some but at the end of the day I still go back to using my SLR, nothing beats DSLR quality 360 photos.
List of 360 Cameras / 360 Camera Rigs
I listed some of the gadgets or ways you can create 360 panoramic photos below. I enumerated some advantages and disadvantages of those that I have personal experience with.
-
DSLR with Fish Eye or Wide angle lens and panoramic head
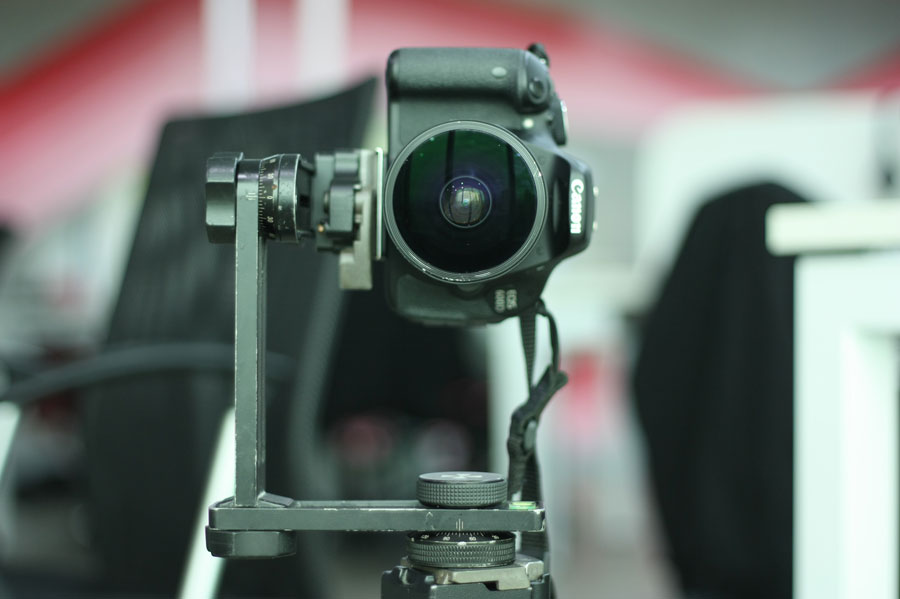
![Canon 600d with Sigma 8mm lens and nodal ninja 3 panoramic head]()
This is the best way to create quality panoramic photos everything else will give you substandard quality. There is a lot of post processing involved but once you get the hang of it, its quite easy to do. In this website I'll talk about how to create 360 panoramas using this combination. The 360 panoramas on top of this page were all taken using my canon dslr (450D and later upgraded to Canon 600D and nodal ninja panoramic head.
The Nodal head on the photo above is a Nodal Ninja 3, I have now switched to Nodal Ninja 6. I will explain why on a later section.
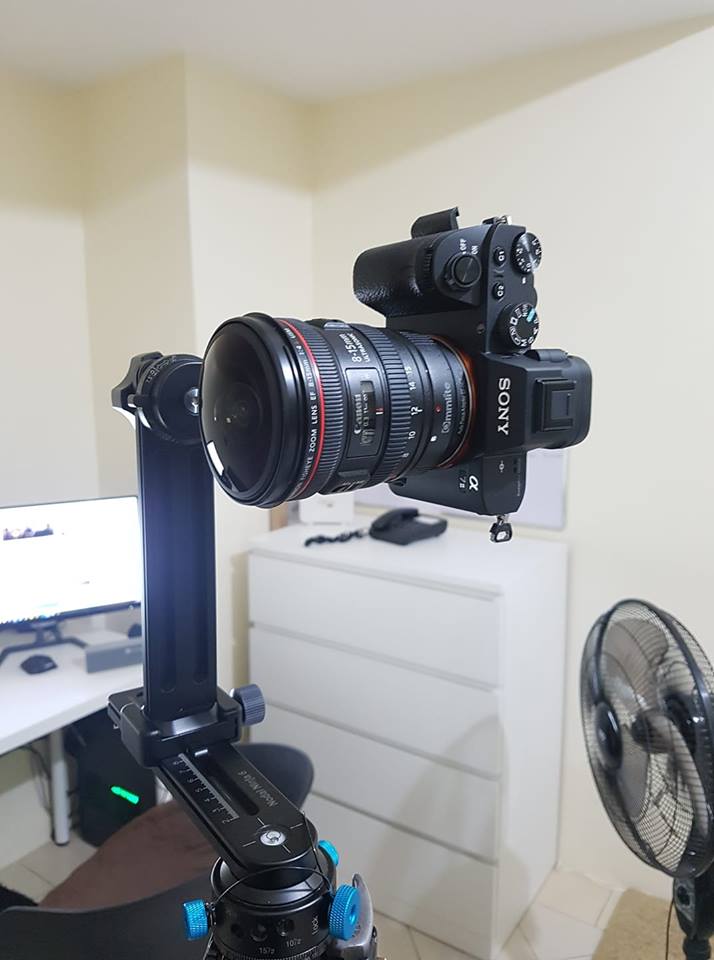
I have also upgraded my camera and lens, below is my setup now (as of May 2019):
![Canon 600d with Sigma 8mm lens and nodal ninja 3 panoramic head]()
The body is a Sony a7ii with Canon 8-15mm lens on a Nodal Ninja 6. I use a Commlite Auto-Focus Mount Adapter EF-NEX for Canon EF to Sony NEX Mount so I can use a Canon lens on a Sony body. I wanted to use a Sony Lens for the upgrade but they're just too expensive. These were the suggestions I got from other Sony users Sony FE 16-35mm F2.8 G Master and Sony FE 12-24mm F4 G
These 360 photos from our Japan trip were taken with this setup.
-
Rico Theta
Update as of May 14, 2019: The latest version of the this camera is the Ricoh Theta Z1. It has better quality image and can do 360 video. Below I talk about the first version, which I personally had experience with. Based on what I've seen online the Theta has improved a lot.
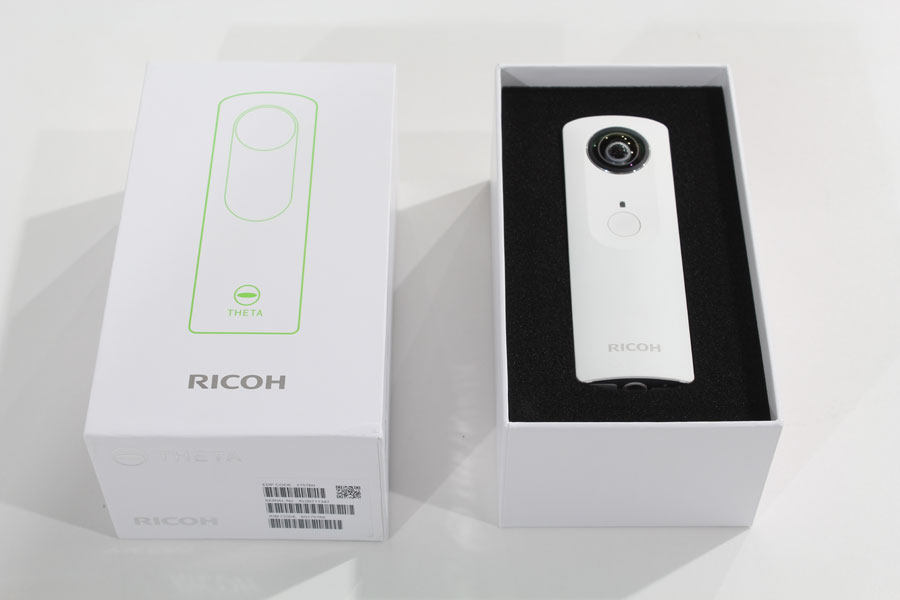
![Ricoh Theta with Box]()
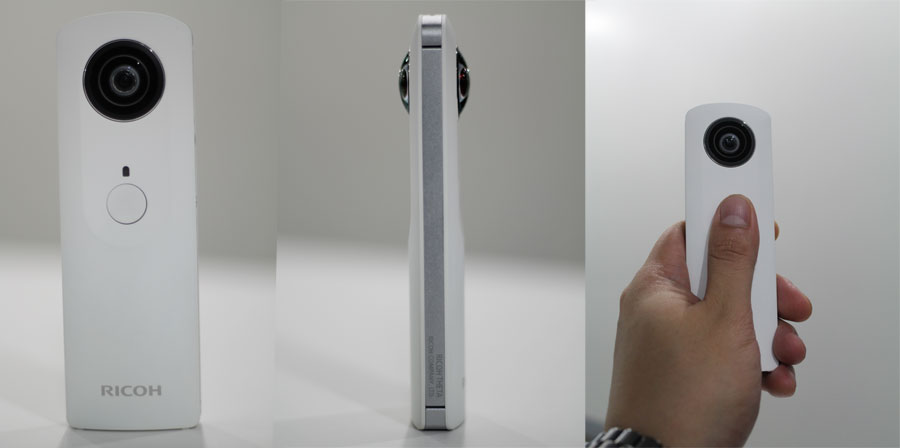
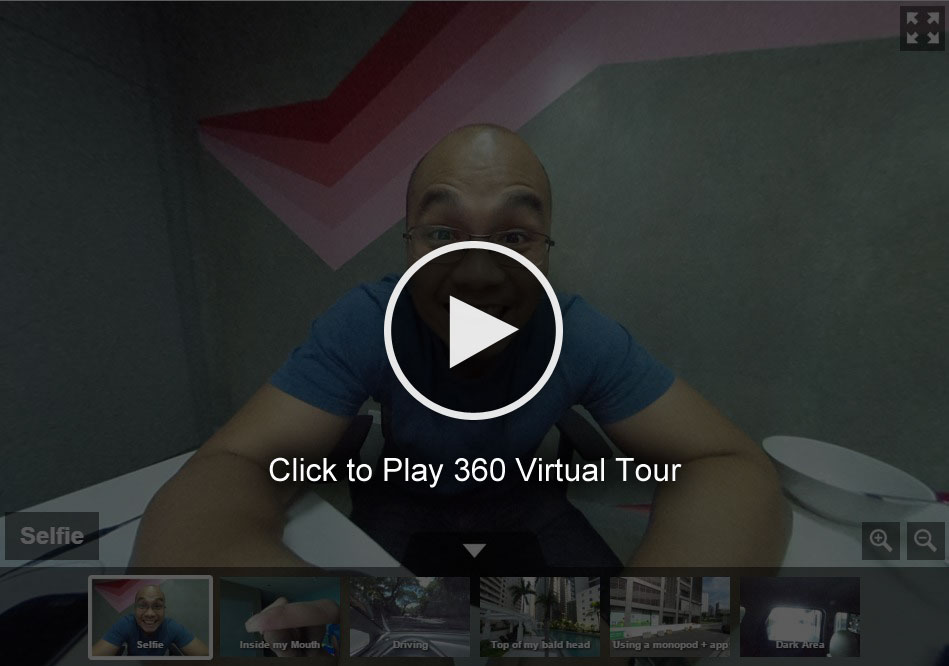
The Ricoh Theta is a small device that can fit in your hand. It has two fisheye lenses facing both sides. Beneath the lens is the shutter button. When you take a photo it's like taking a selfie because you will always be in the shot holding the camera but you can control it remotely using an app.
![Ricoh Theta front view, side view, and in hand]()
A lot of one shot cameras have come out in the past few years but this one looks most promising. Its affordable around $399.95. The output is not bad, a little grainy but has little stitching errors. It's not a professional camera it's something you'll use just for fun.
I was able to get my hands on one of these and was able to play around with it. See the shots I took below. Like I said, it's like a selfie camera so if you don't want yourself in the scene, shoot on top of your head (check scene 4) or use a monopod raise it above your head and use the app to trigger the shutter (scene 5). Using it outdoors on a sunny day will give you the best result (scene 5), in a dark area it gets too grainy (last scene). I'll write a detailed review about this device in the future.
![Ricoh Theta Sample Shots]()
A close competition to the Ricoh Theta / Ricoh Theta S is the Samsung Gear 360. I haven't tried this one yet but I've seen the sample photos and videos and they look very promising. So if you are considering the Ricoh Theta S, you should have a look at the Samsung Gear 360 as well. I'll write a review on this camera once I get my hands on one.
-
Go Pro Array
![Freedom360 on top of car]()
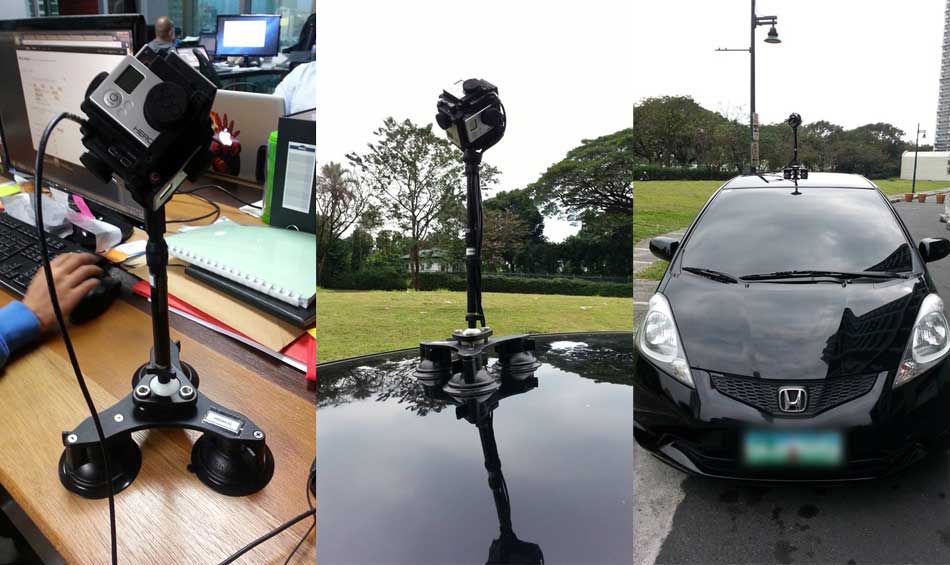
You can also use a series of gopros to create a 360 panoramic photo. Here are the 2 most popular companies creating the rig to hold the gopros : freedom 360 and 360 Rize.
The one we used before was a Freedom360 Classic Mount. This is the one on the photo above.
This type of setup is more for taking 360 videos. I've tried it and it's hard to create a 360 photo when you're moving because of sync issues. You can use a gopro remote to trigger the cameras (up to 50 according to the manual) but there is a few seconds delay meaning they dont all fire at the same time. This delay is bad if you're taking a 360 photo while in action like riding a roller coaster or driving a car. You can still use if for taking a 360 photo of places and non action shots.
For photo the quality too is not that great, it is sharp but nothing beats a DSLR. Also if you're just taking photos this is too expensive. Imagine buying 6 gopro and then the mount.
Another problem you'll have with this kind of rig is the stitching errors. You'll see a lot of misalignments in your image when you are shooting near objects, or in tight spaces.
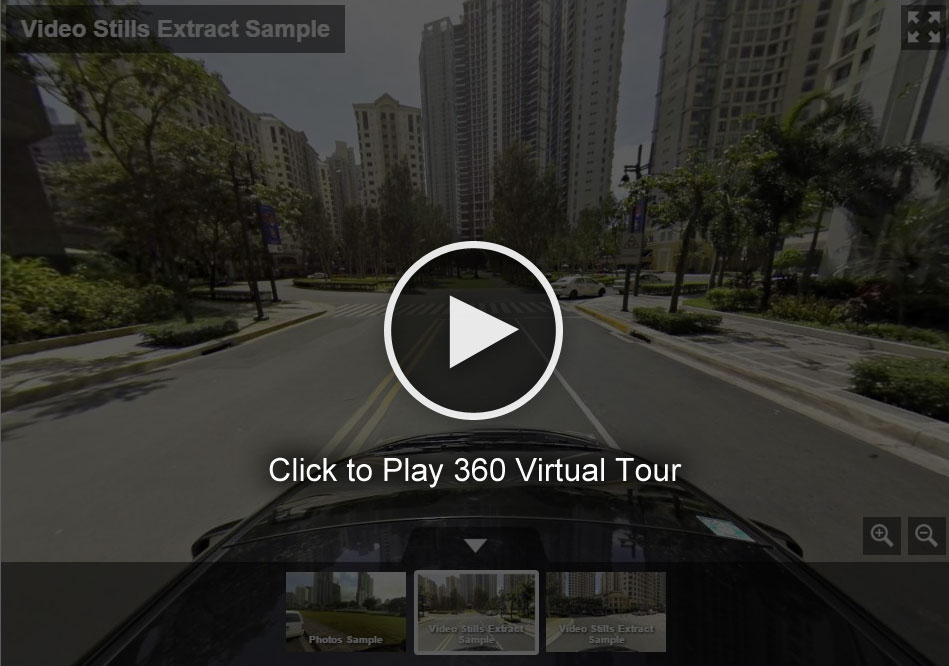
The company I work for purchased a freedom 360 rig and 6 gopro hero blacks. I used it for a street view project (similar to google street view) I did for them. Since there is an issue with the delays when taking photos I had to record video while driving the car and then later extract to stills. This way I am sure that footage is sync, if 1 camera lags behind then I'll adjust the frames when post processing.
Below are sample 360 panoramic photos taken using freedom 360. The first scene was actual photos, while the 2nd and 3rd are video stills.
![6 Go Pros on Freedom 360 sample 360 tour]()
Update (May 2019): Sometime in 2016 GoPro released their own mount to fix the sync issues I mentioned above called GoPro Omni, however they seem to have discontinued it. I can no longer find it on their website.
-
Photosphere App on Android
Update (May 2019): There is no more Photosphere it seems to be part of Google Camera now. I haven't checked Google Camera recently.
![Samsung Galaxy S3 with Photosphere app on a nodal ninja 3]()
Android Jelly Bean 4.2 has an app (it's now bundled with Google Camera) for taking 360 panoramic photos. It's called photosphere. To use it you just open the app and point the camera where the blue dots are until you've completed a full 360 spin. You can then upload your panoramas to google views so you can share the image to your friends.
The downside to using this is you have to keep the phone rotating in one spot which is hard when doing it hand held. There will be a lot of stitching errors if you move a lot. Taking photos takes trial and error, sometimes you get a good 360 panorama in one take, sometimes you have to try a few times. There are times when the app can't stitch the whole image.
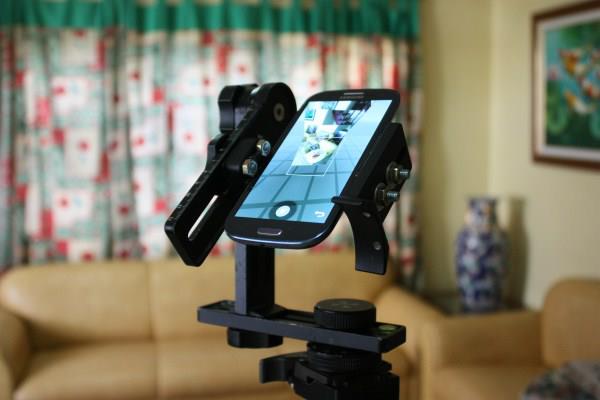
I created a custom nodal head for my Samsung Galaxy S3 by dismantling may pano pro rig and combining it with my Nodal Ninja 3 Panoramic head. That's the image you see on top. Below are the results. I expected a perfect stitch but as you can see there are a lot of stitching errors.
![Android Photosphere sample 360 tour]()
-
Photosynth on IOS
Update (May 2019): There is no more Photosynth. Read Article about it here
Apple also a similar app to Photosphere, it's called Photosynth. It works the same way, you shoot using your Iphone and then you can upload it to the Photosynth website.
-
Popular 360 Cameras
Here's a list of consumer 360 cameras that I know of.
- Go Pro Fusion - I have this but I use it for 360 Videos. Like I mentioned when it comes to taking 360 photos I use DSLR. What I love about this camera is you can shoot in 360 and edit later as a normal video and have the ability to pan around, they call the feature Overcapture.
- Ricoh Theta Z1 - I talked about a previous version of this above. It looks promising.
- Insta360 One X - Aside from taking 360 photos and 360 videos, you can use this device to create a bullet time effect video. You can also use it to create hyperlapse videos.
- Xiaomi Mi Sphere - I haven't tried this yet but it's quite popular and see it mentioned a lot in Facebook Groups, etc.
- Garmin Virb 360 - Before buying the GoPro Fusion I was considering this camera. I ended up with the Fusion because of the availability of the accessories like mounts, etc.
- Samsung Gear 360 - I've seen the samples, I'm not happy with the quality
- Nikon Key Mission 360 - Also not happy with the quality of this camera based on the samples.
- LG 360 Cam - This one shot camera is not that popular.
- iStar - Another one shot rig, they're marketing it as a rapid 360 solution. No photoshop and editing and it has HDR (High Dynamic Range) capabilites. Again, too expensive.
- Panono - Panoramic Ball Camera - The panono is a one shot 360 camera similar to the theta but the way it works is you toss it in the air and it takes a photo when it is on the highest peak. The idea is great but for a device with so many lenses, the quality is not that impressive.
- Lady Bug - I believe this is what Google used before for street view. Too expensive too if you're just some dude who wants to shoot 360 panoramas.
- Eye Mirror 360 - I believe the guys who are building this are the ones from pano-pro too. You can use it on a gopro. I doubt the quality will be good but it might have some cool uses.
- Bublcam - Another 360 camera, this uses a series of cameras. It's already funded in Kick Starter but their website seems to be down, I'm not sure what happened to them.
- Giroptic - Another kickstarter funded device, looks better than the Bublcam.
- Matterport - This one is amazing! It takes a 360 of the room and then creates 3D models. Using the player you can switch from floor plan, dollhouse, to 360 view. I don't fully understand their pricing structure but it seems you have to buy the device ($4500) and also subscribe to a plan for the processing of the shots. I'm not sure if you can do the processing on your own.
- DIY - Streetview.com - This uses go-pro arrays but they've hacked it to solve the sync issue. This is used specifically for street view purposes. I wanted to buy it but it's too expensive.
Here are other 360 rigs but mostly used for 360 videos
- Kodak PIXPRO - I used to have one of these but after getting the GoPro Fusion I no longer had any use for it so I sold it.
- Nokia Ozo - This was popular for 360 videos but has been discontinued by Nokia.
- Sphericam - For 360 videos as well, project of Jefrey Martin, founder of 360cities.net
- Mini EYE - VR rigs built around the Blackmagic micro cameras, ranging from 3 to 10 cameras per rig
- Back Bone - They produce lenses wide angle for GoPro, which allows you to use fewer Cameras, easier to use and manage.
- iZugar - same as back bone they sell wide angle leses for GoPro
- Z Cam S1 - I have one which I use for 360 Videos.
- Z Cam S1 Pro - A better more expensive version of the S1
- Insta360 Pro - I preferred this over the Z Cam S1 but it was just more expensive.
- Insta360 Pro 2 - A better version of the Insta360 Pro, I'm thinking of upgrading to this to replace my Z Cam S1.
- JAUNT ONE VR
- Detu Max
- Ultracker Aleta S2C
My Panoramic Photography Gear
By this time you already now the different ways to create 360 panoramas. Now I will show you how I shoot mine. I'll start with my gear.

-
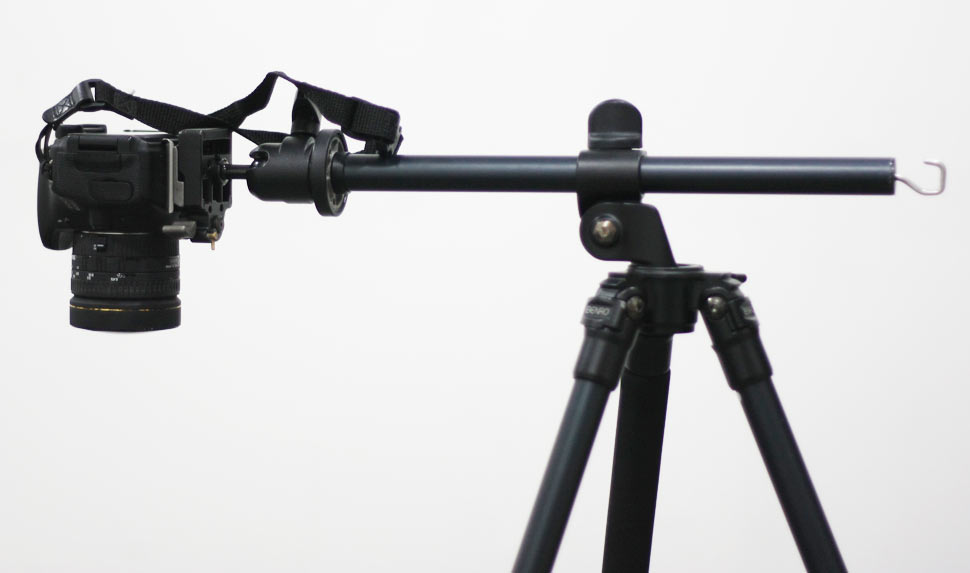
Benro A1980T Tripod - What I like about this tripod is it has a lateral arm, good for cases when you have to shoot the floor. So far I've only had to do this once, in most cases you can photoshop the tripod out of the nadir (down) shot.
![Benro A1980T Tripod lateral arm]()
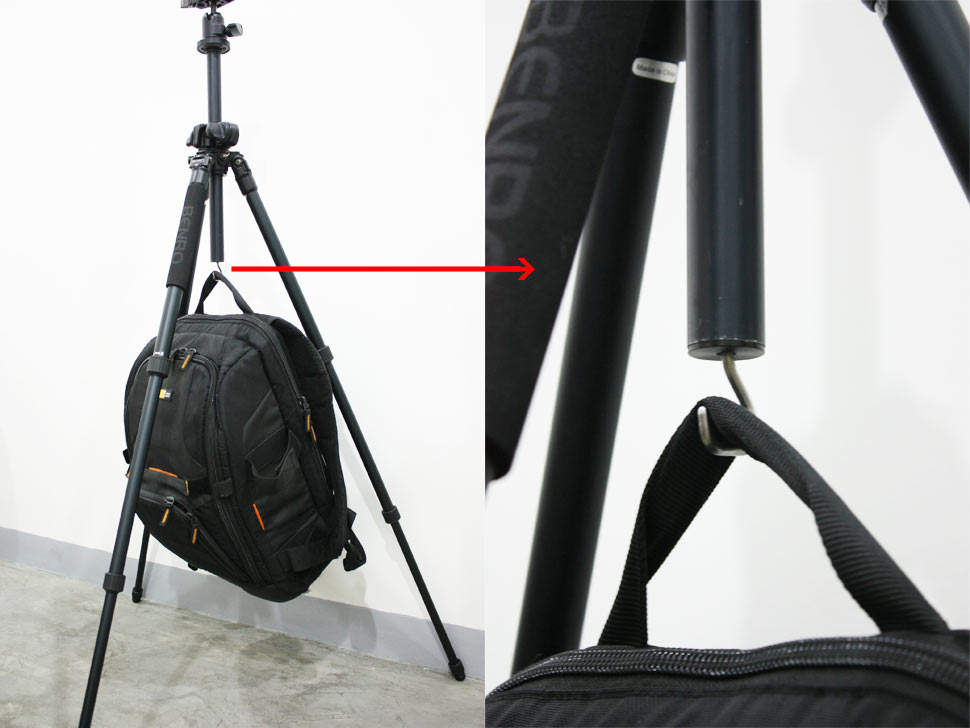
It also has a hook at the bottom so you can add some weight for stability. This is useful when where you're shooting outside and its windy.
![Benro A1980T Tripod Hook for weight]()
-
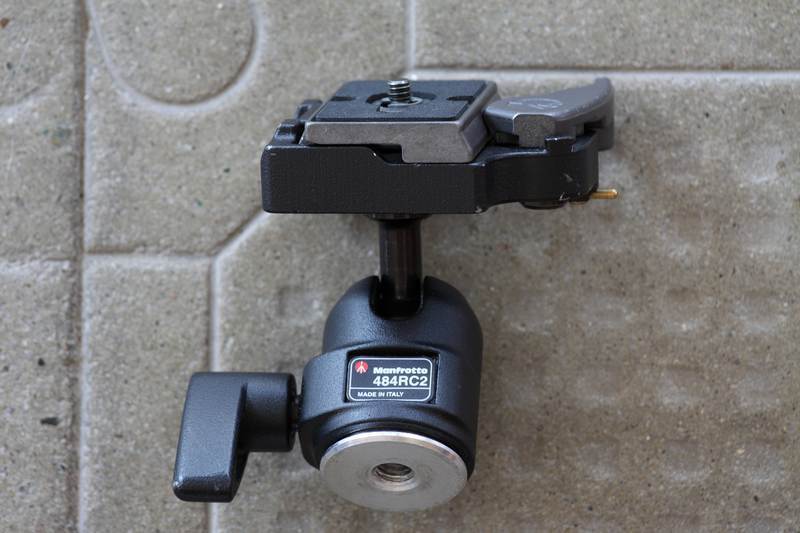
Manfrotto 484RC2 - This one is old you won't find this one anymore. The replacement for this is the Manfrotto 494RC2 Ball Head with Quick Release Replaces Manfrotto 484RC2
![Manfrotto 484RC2 Ballhead]()
-
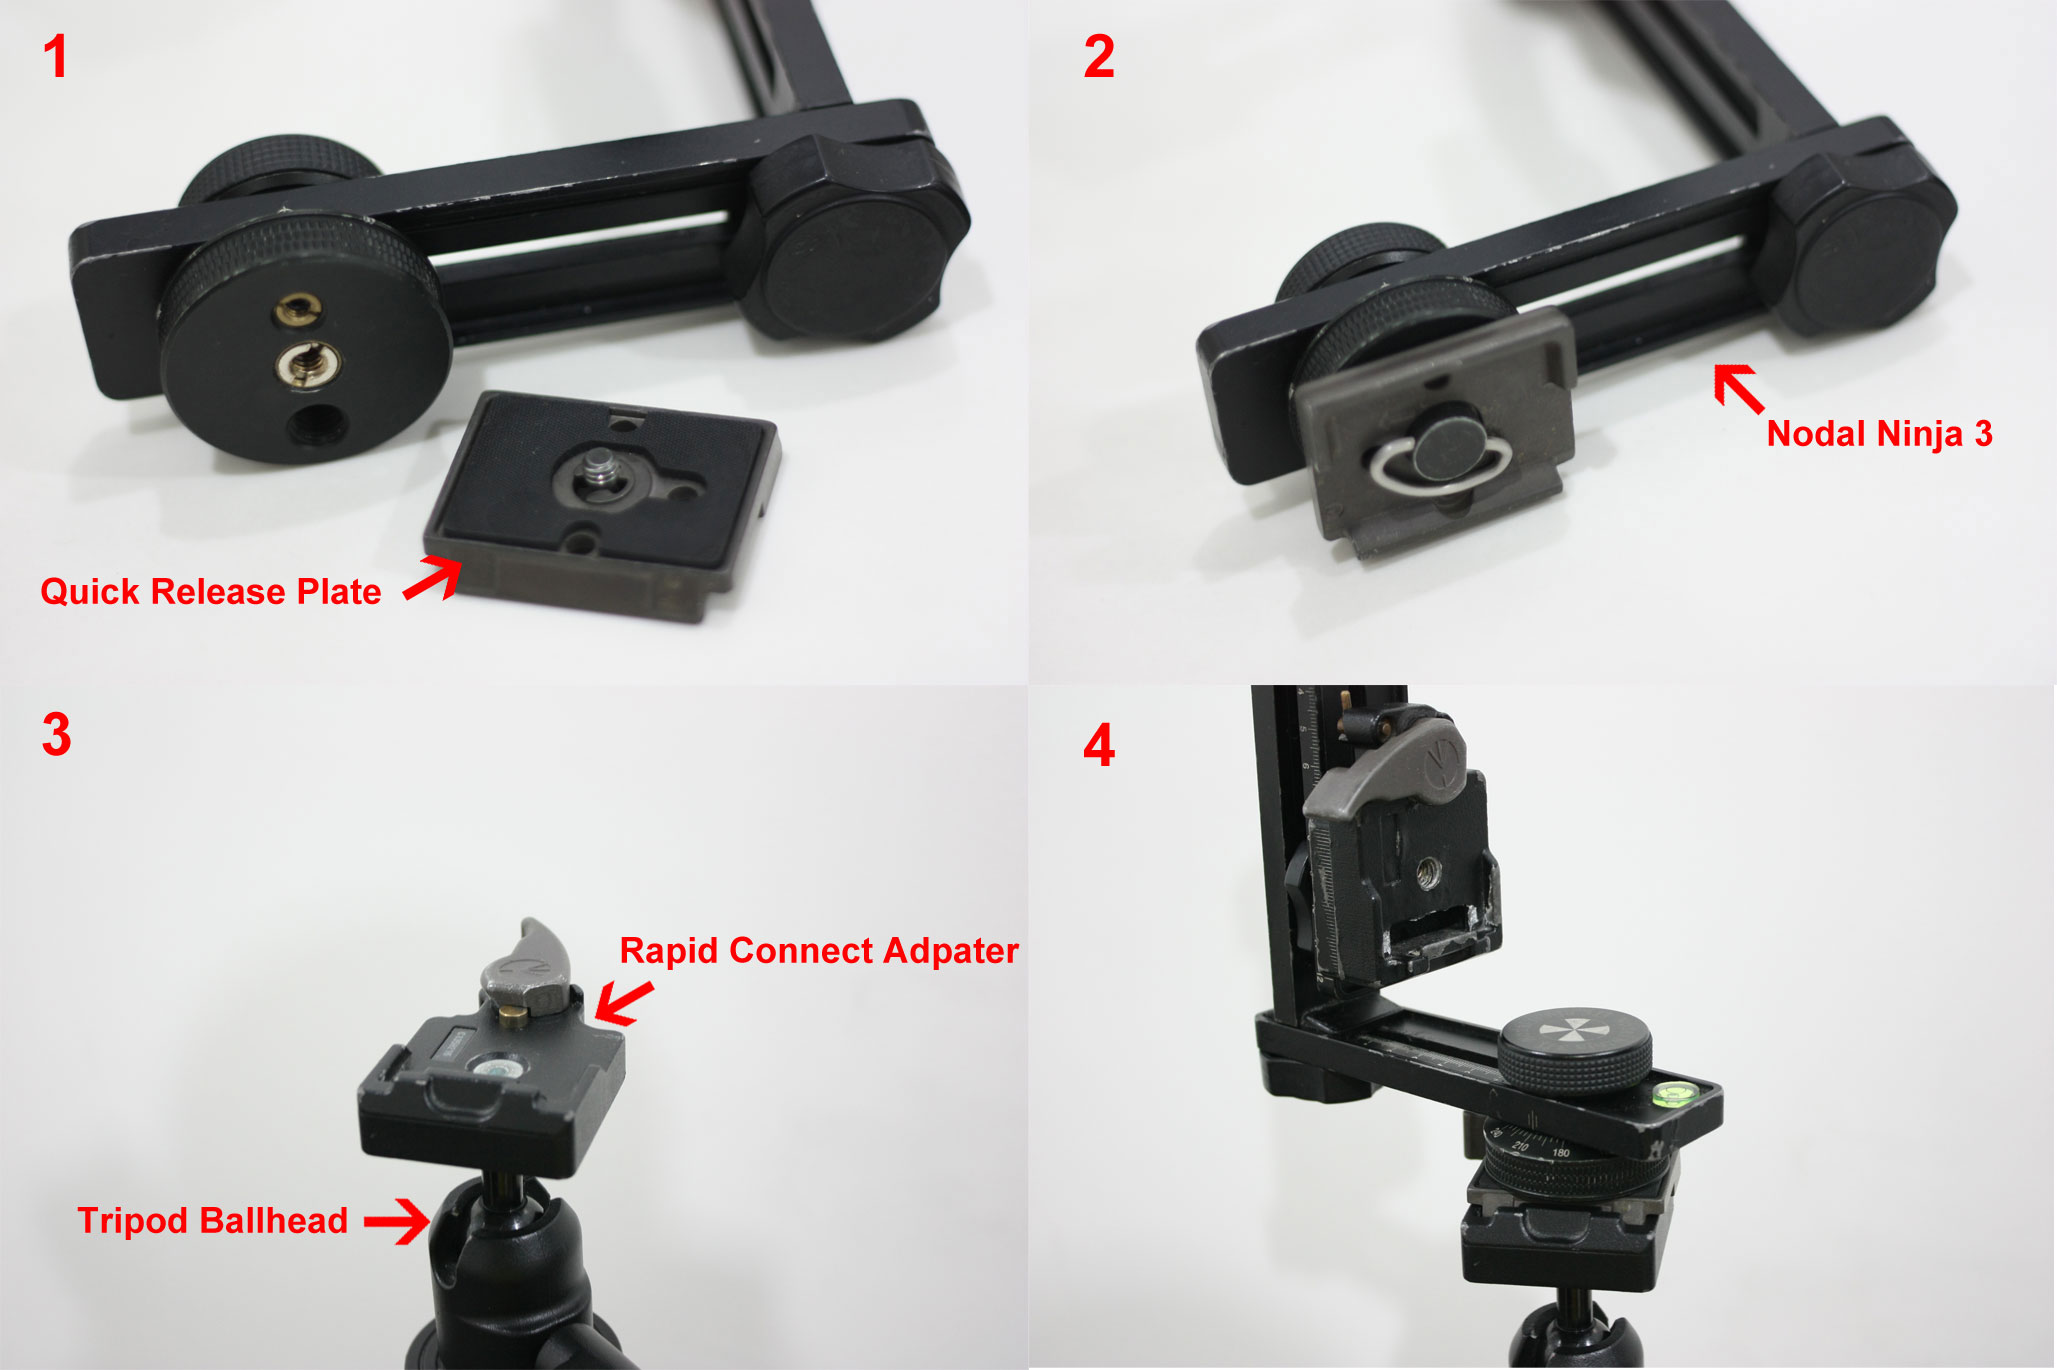
Manfrotto 323 RC2 Rapid Connect Adapter with 200PL-14 Quick Release Plate - Replaces 3299-Black - This item consists of two parts. The quick release plate is the one you see on the first image below. I use it to connect the nodal head to the tripod ballhead.
![Manfrotto Rapid Connect Adapter and Nodal Ninja 3]()
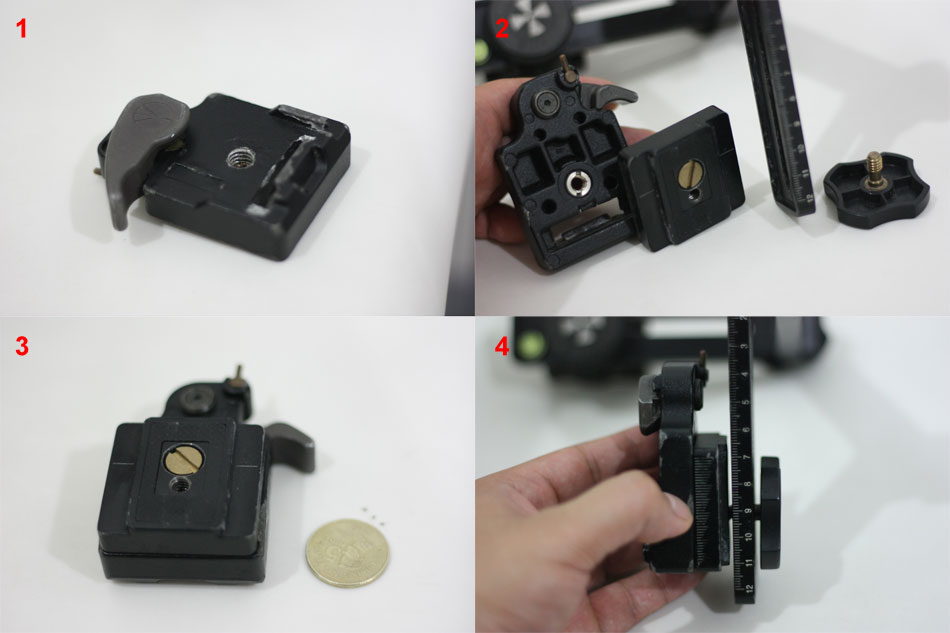
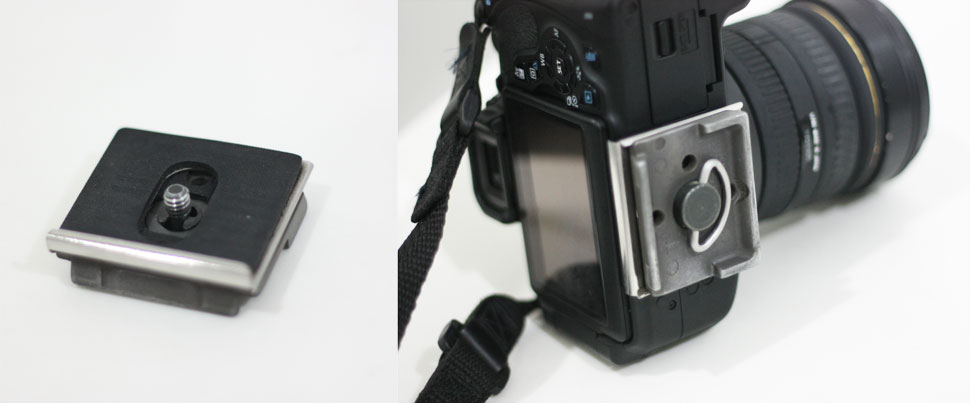
The second part is the Rapid Connect Adpater , I use it to connect my camera to the nodal head. The Nodal Ninja 3 has this plate which you screw to your camera using a coin. So instead of screwing your camera directly to this, you screw it to the rapid connect adapter. But before you can mount your camera to this you have to have another quick release plate on the camera this time (see #7 below). When you have all this setup it's easy to remove and mount your camera.
![Connecting Manfrotto 323 RC2 Rapid Connect Adapter to Nodal Ninja 3]()
-
Nadir minimizer - I just invented that term. Nadir refers to the bottom shot (floor) of your panorama. This is a custom built metal rod. I had it made because the ballhead appears too much in the nadir shot and I have to photoshop it out of the image everytime. To lessen my post processing I put this extension which makes the nadir smaller. I'll explain all this later on. You don't need this you can just directly connect your panoramic head to the ballhead. This is optional, you can connect the ballhead with the quick release (#2) plate directly to the nodal head (#5).
![]()
-
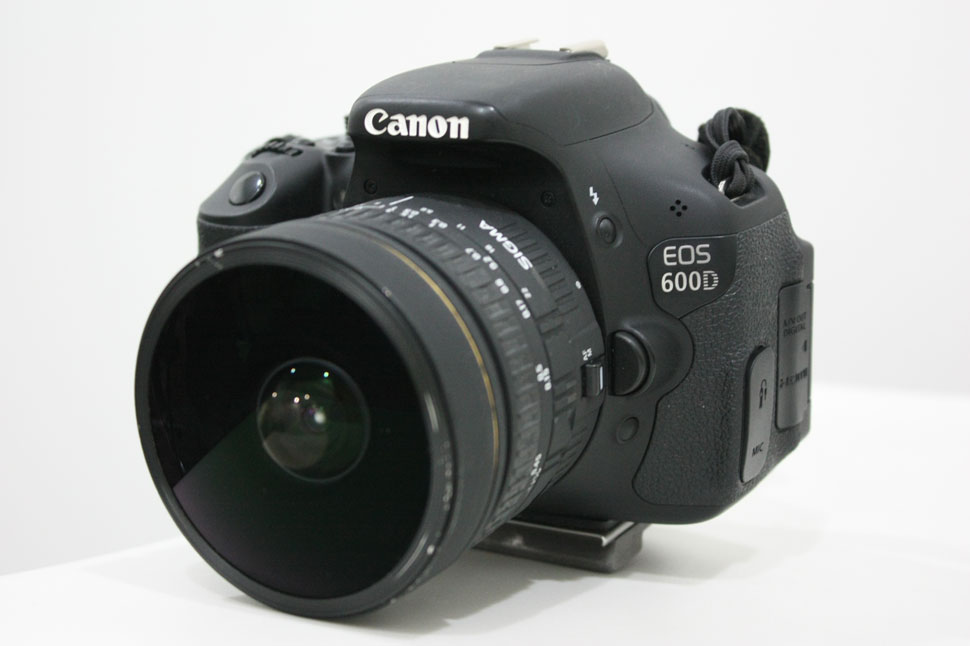
Canon 600D with Sigma 8mm Fisheye Lens - Why Canon? Why 600d? When I started out I didn't have a camera and my brother had a Canon 350d, so I just bought a fish eye lens for that body and all I could get my hands on was a Sigma 8mm f3.5. When it was time to buy my own camera I got a Canon 450d, and then later on I needed a spare camera so I bought a 600d which became my main camera. For the longest time I wanted to upgrade and get a canon 5d mark 2 with Canon 8-15mm lens, I heard this was the best lens camera combination for shooting panoramas but this was too expensive. Then one time I saw the work of this guy and I was blown away by the quality. When I asked him what equipment he used he said Canon 450d + sigma 8mm which was exactly the same as what I was using. I realized there was no problem with my gear, I just needed to improve my post processing techniques.
![Canon 600d with Sigma 8mm f/3.5 EX DG Circular Fisheye Lens]()
-
Pano Head / Nodal Head is a piece of equipment that you attach on your tripod to allow your camera to rotate on its nodal point.
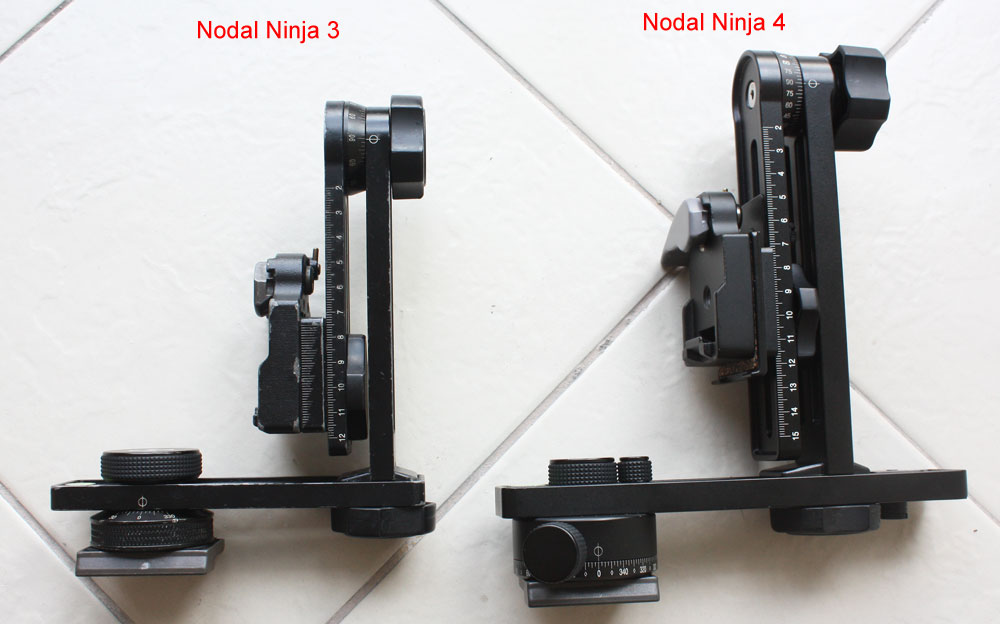
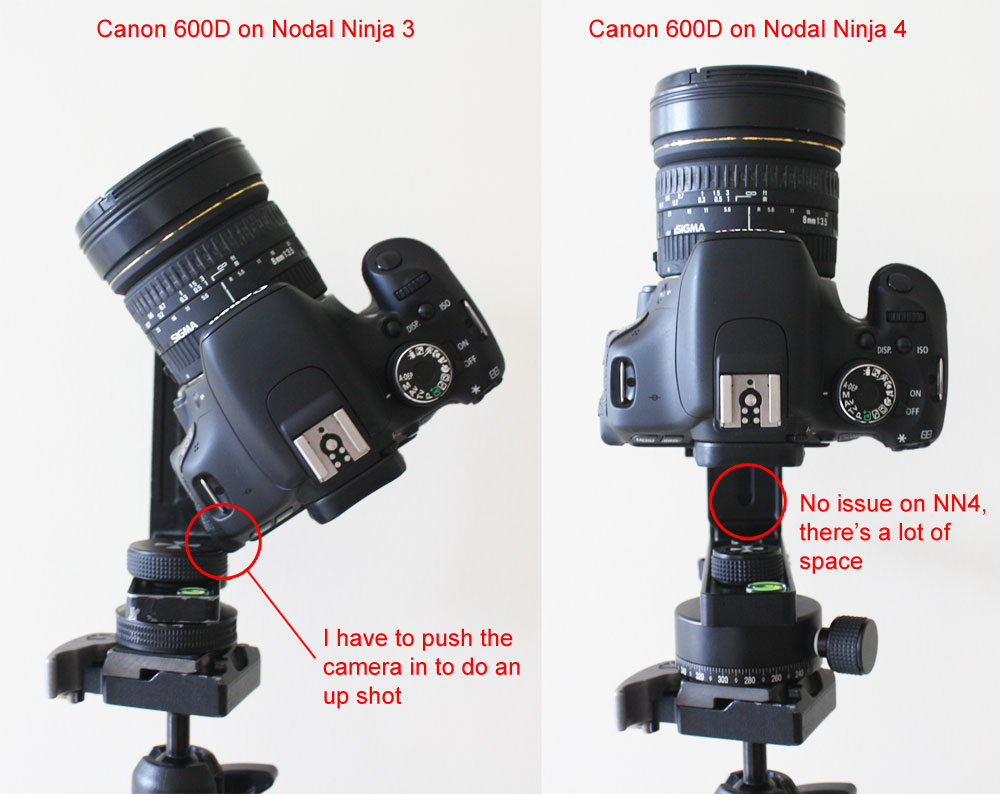
The one you see on the photo with the numbers is a Nodal Ninja 3, that fit my older cameras (canon 350d, 450d) but now it's too small for my canon 600d, Which is why I upgraded to a Nodal Ninja 6
![Nodal Ninja 3 and Nodal Ninja 4 side by side comparison]()
The only problem I had with the Nodal Ninja 3 is it's hard to do an up shot because it's too small for my camera and I have to push it in but other than that Nodal Ninja 3 is a very good nodal head. It has been with me since 2009 and I haven't had any problems with it.
![Nodal Ninja 3 and Nodal Ninja 4 with Canon 600d zenith shot position comparison]()
I suggest you get the Nodal Ninja 6 Starter Package so that when you upgrade to a bigger camera you won't have any issues. Here are a few more photos of the NN 4
The case and the accessories that come with it
![Nodal Ninja 4]()
You can use a coin to remove the thread converter.
![Nodal Ninja 4]()
![Nodal Ninja 4]()
The Camera Mounting Plate
![Nodal Ninja 4]()
This is how it looks when mounted to the Camera.
![Nodal Ninja 4]()
As I've mentioned I use a Rapid Connect Adapter. This is not included with the package you need to purchase this separately.
![Nodal Ninja 4]()
How my setup looks like now.
![Nodal Ninja 4]()
To know the settings for your Camera check this page, you'll see a link for canon, nikon and other cameras. You'll see what nodal head fits a certain model and the settings for it.
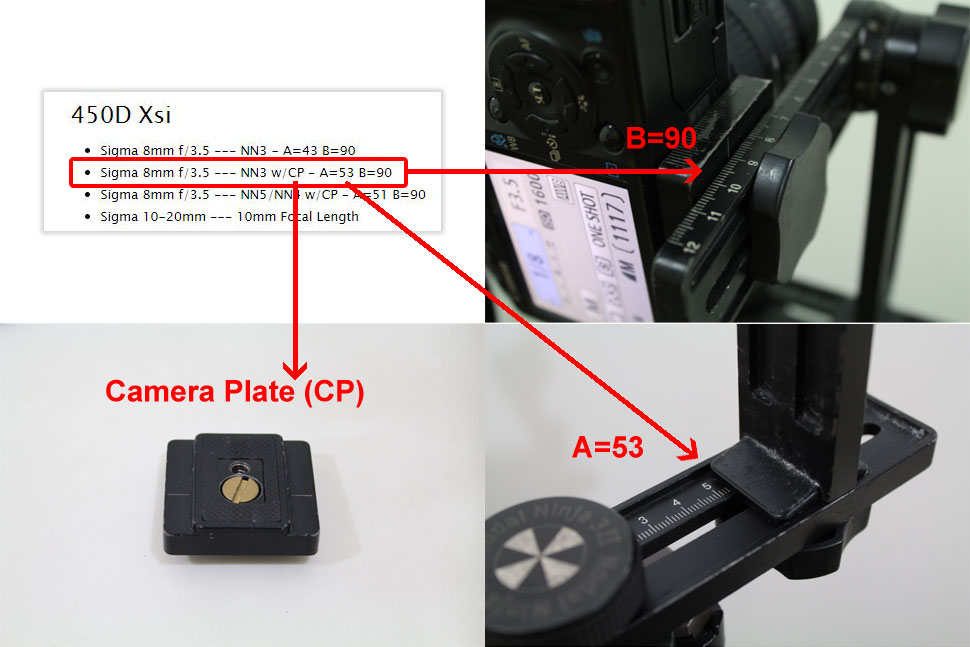
Since my Canon 600d is not for Nodal Ninja 3. I'll use my older camera 450d to show you how the settings in the website translate to the actual thing.
![Nodal Ninja 3 settings for canon 450d with sigma 8mm fish eye lens]()
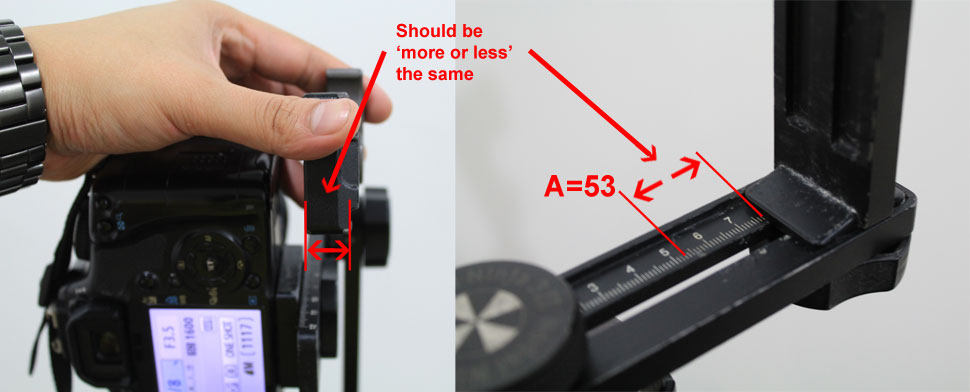
If you're adding Rapid Connect Adpater like I did, then you'll have to adjust the "A" settings. Right now its 53, so add the width of Rapid Connect Adpater and that should be your new "A" setting. I didn't actually measure it I just used the max setting as seen on the photo below.
![Nodal Ninja 3 settings for canon 450d with sigma 8mm fish eye lens with Rapid Connect Adapter]()
For a more in-depth tutorial on finding the nodal point watch this video on youtube
Below are some other Nodal / Panoramic Head manufacturers, you might want to check them out.
If you're saving money you could consider building your own 360 panoramic head. Check this article from diyphotography.net on how to build your own 360 panoramic head.
-
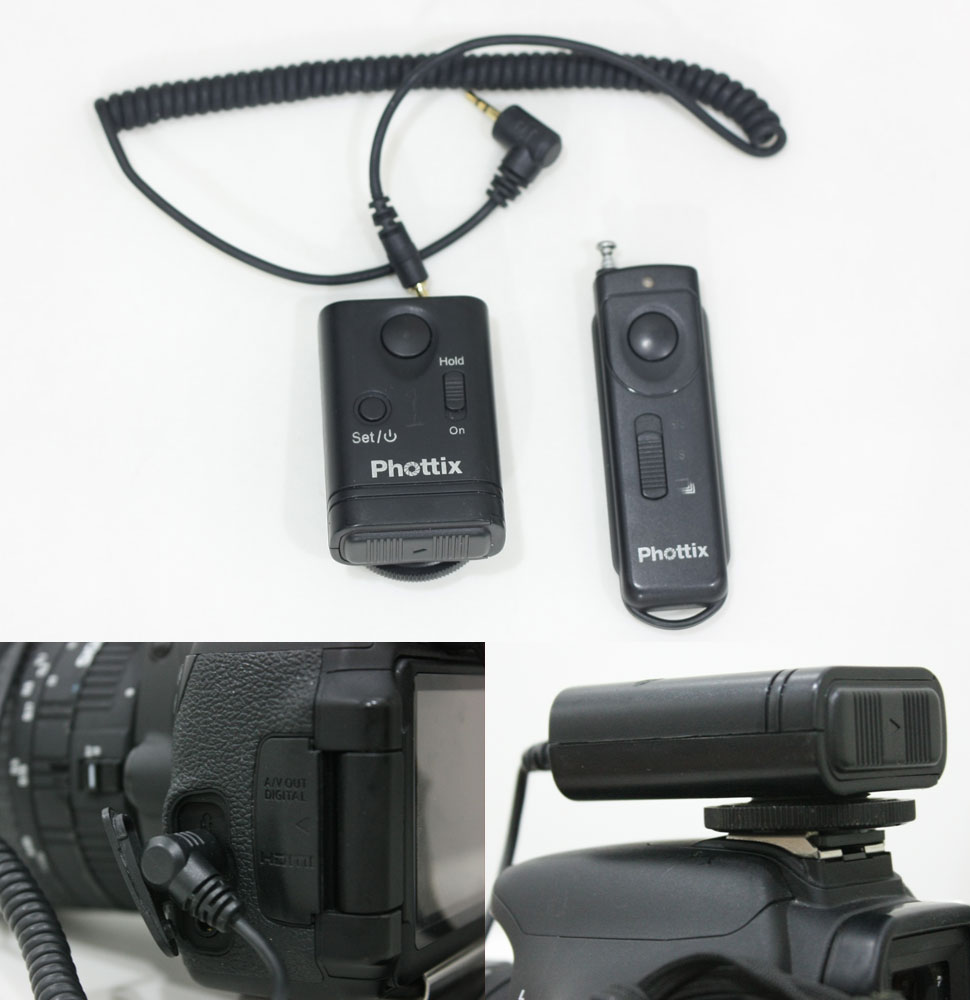
Phottix Cleon II C6 - This is the wireless remote shutter release I used but when it broke down I can no longer find a replacement here in the Philippines.
![Phottix Cleon II with C6 cable]()
Before I used the Canon Remote Switch RS-60 E3, the problem with it is the cable is short and there are cases where you really need to hide because you will be in the scene like a room full of mirrors. With a wireless shutter you can hide inside a room and trigger the camera from there.
This is what I use now and I like it better than the Phottix Cleon, its a Yongnuo Wireless Flash Trigger. It's a flash trigger but can be used as a remote shutter trigger as well. Using the provided cable just connect one to the Camera and then on both devices change the settings to TRX (there's TX, TRX, and OFF) when you press the shutter on one device it activates the other. Just don't forget to bring it back to OFF when you're not gonna use it otherwise it will drain the battery.
![Yongnuo wireless flash trigger]()
![Yongnuo wireless flash trigger]()
-
Manfrotto 200PLARCH-38 Architectural Anti-Twist Quick Release Plate with 3/8" Screw - This is the partner of the Rapid Connect Adpater I showed above. Basically it's a quick release plate with L shaped thing at the end to prevent the camera from twisting.
![Manfrotto Anti-Twist Quick Release Plate]()
How to Shoot a 360 Panorama
Before I shoot I analyze the scene and imagine where to best put the tripod. I turn on all the lights, turn off any fans or air-conditioning that may move some items like curtains.
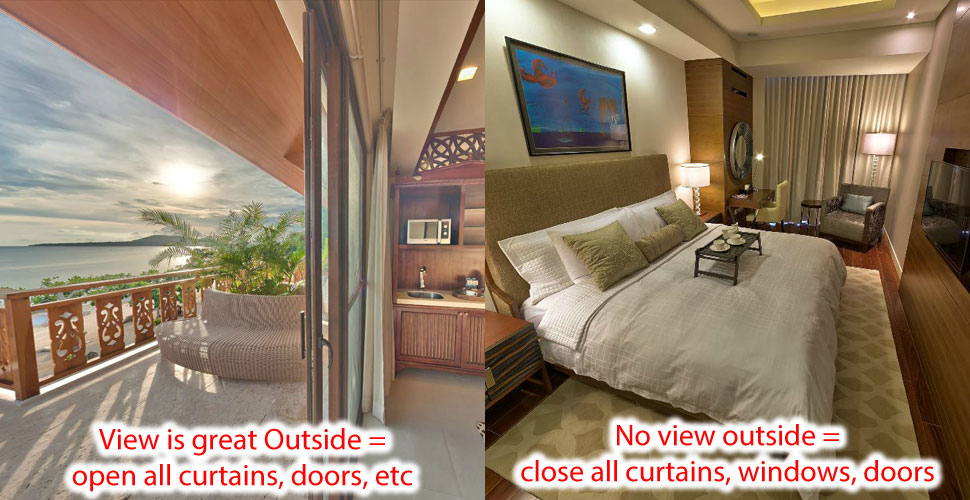
Depending on how I want the lighting to be, I either close all curtains or open them all. If there's no view outside I prefer to close all windows and curtains. If the view outside is wonderful then I will open the curtains.
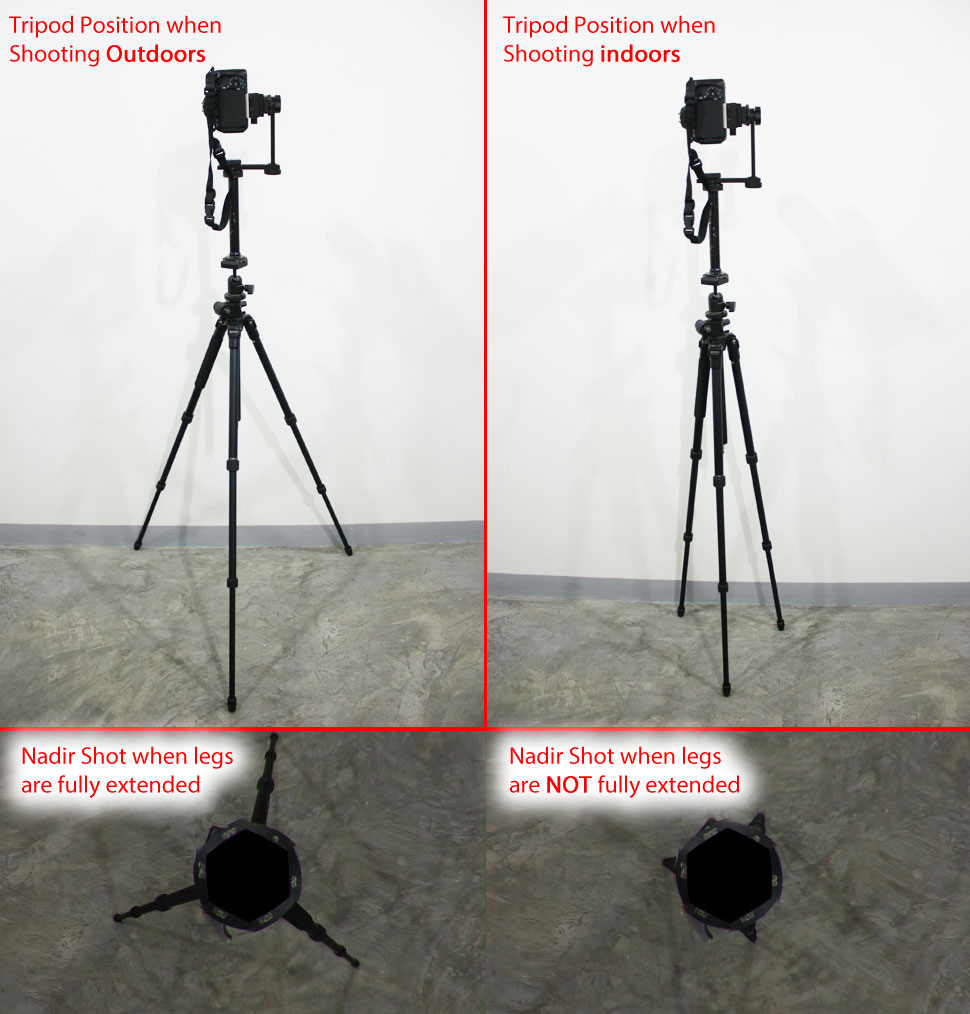
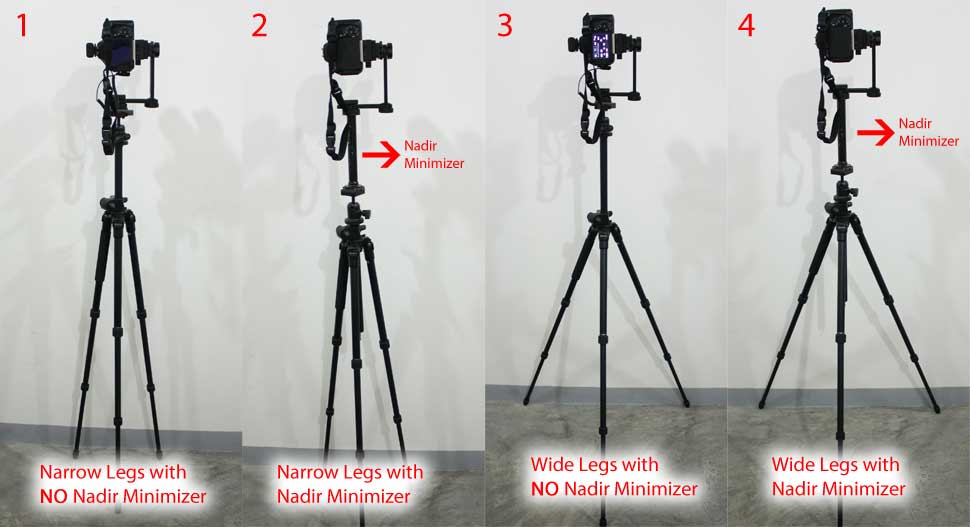
When I'm shooting indoors I don't fully extend the tripod legs, this is to minimize the space it occupies on the down shot. The problem with this is it is not very stable, a slight accidental push might send your camera and tripod to the floor. When I am outside where it's windy, I extend the legs out fully. In my experience it's easier to photoshop outdoor shots. Let's say your in a grassy or sandy area It's so easy to clone the ground. You can see the difference in the image below, extending the tripod legs to its maximum will show a lot of it on the scene and will require you to edit some more just to remove it.
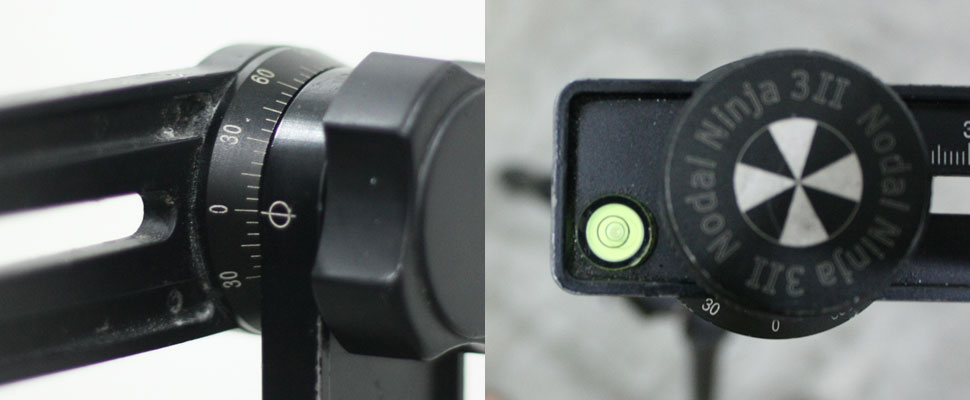
Next thing I do is I clip the camera to the nodal head. check if the nodal head horizontal arm is at the 0 degree position, also see if tripod is level by checking the bubble level
Next, Check if my lens is set to Manual focus and see if the focus ring is set to it's sharpest position for F8.0 apperture. This will not be the case with other camera lens combination. You will have to find the sharpest focal point of your camera by doing trial and error. For me, this is the best setting.
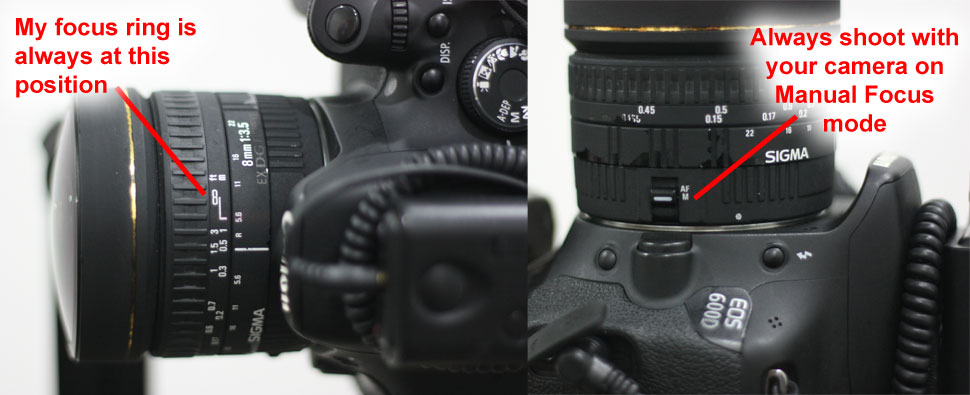
Settings are : Set ISO to 100, Aperture at F8.0, White Balance - depends on the scene but I usually shoot at auto and just adjust during post processing stage. Image format to JPG Large. To make this tutorial easy I'm using jpeg but normally I use raw (I'll teach this in advanced lessons). Shutter speed is variable and will depend on how bright or dark the scene is.

To take an entire scene I shoot 6 shots around at 0, 60, 120, 180, 240, 300 degrees. The 7th camera position above is optional and I only do this when there is a pattern on the ceiling. For example you were shooting the Sistine Chapel where there's a painting on the dome ceiling, you'll need an up shot in that case but for most cases like just a plain white ceiling, blue sky, or cloudy sky you won't need to and you can just photoshop the tiny black hole out of the scene, I'll show how this looks later.

Below are the results. These are the stitched images, no post processing yet like sharpening, removal of the tripod / tripod shadow. You will see that there are black holes on the top shot and the down shot. These are the ones you will edit out. In these sample shots I did not take an up shot(#7), if I had that block hole on the ceiling would have disappeared. I created 4 360 panoramic shots with different tripod positions and with/without the nadir minimizer to show you the effect on the down shot. I illustrated the tripod positions on the image after the virtual tour below.
Post Processing
For stitching I use PTgui. You can download a trial version if you just want to try it out. If you don't want to buy PTgui you can try Hugin. Hugin is an open source panorama stitcher, meaning its free. I haven't tried it myself but I heard a lot of good things about it. In this tutorial I am using PTgui.
I've made the images downloadable so you could follow along.
Download Fisheye Shots (36.2 MB)Open PTgui and the folder where the images are at. Select all 6 images and drag them to the PTgui window.
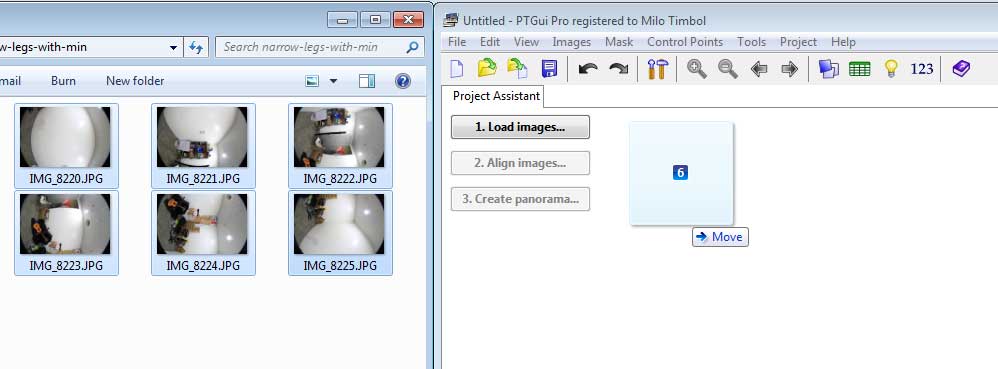
The Align Images will become enabled. Click on it.
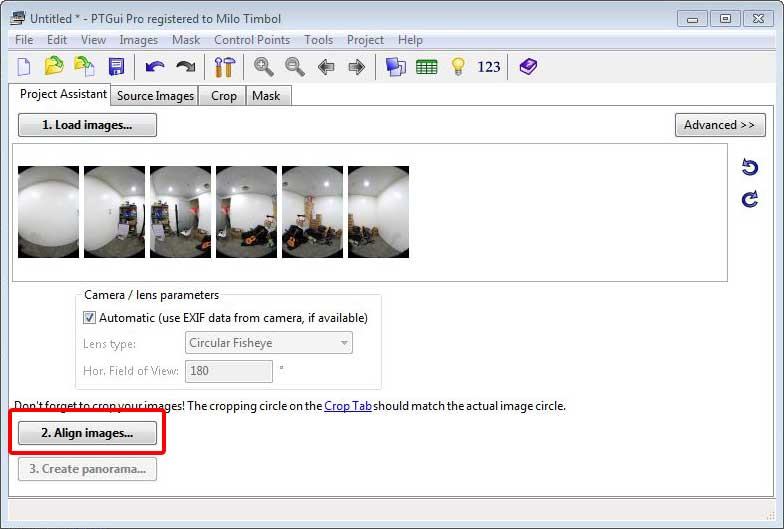
A window with the progress bar will pop up.

When it finishes the Panorama Editor screen will appear. In this screen you can center the panorama, fix vertical alignments, etc. You can already close this window but if you want to see an interactive 360 version click the magnifying glass icon.
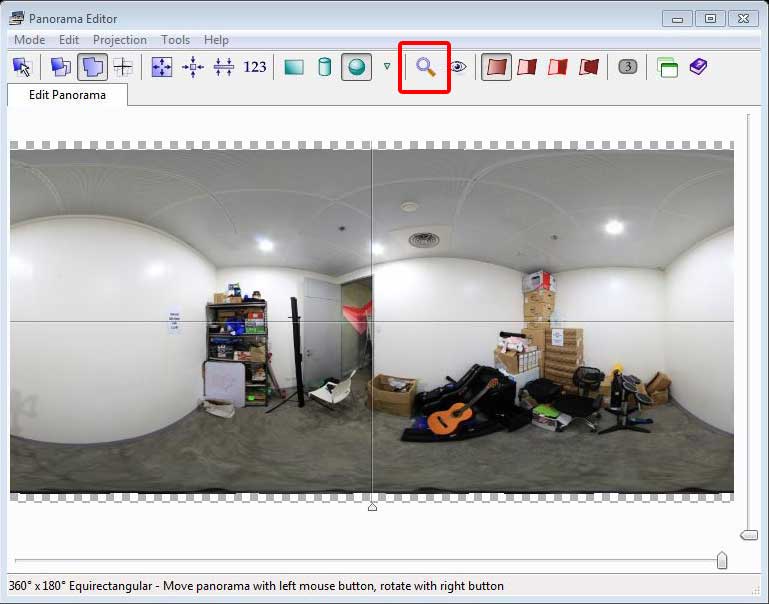
Clicking on the magnifying glass icon will bring you to the Detail Viewer window. You drag the screen to pan the image. It's an interactive preview of the 360 panorama. When you're happy with the results close the window.
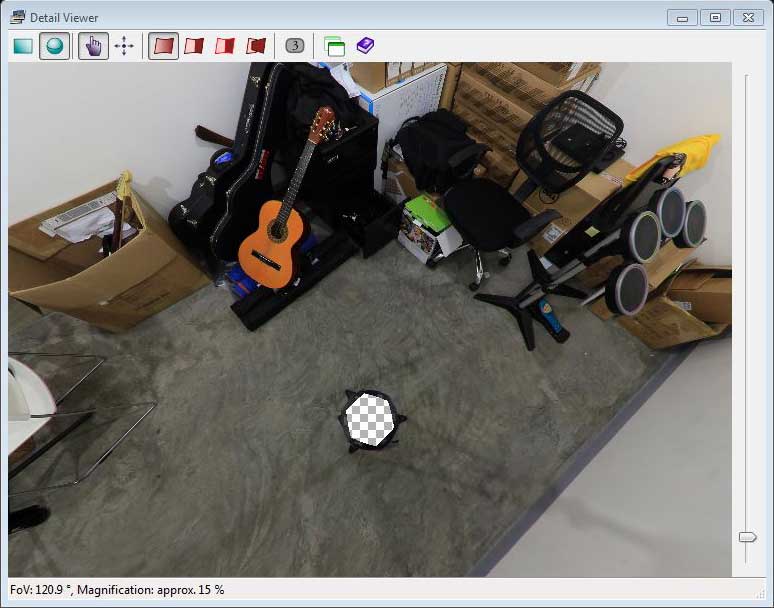
The original window didn't disappear when the Panorama Editor appeared it was in a separate window, same as the Detail Viewer. By closing the other windows you'll just return to the main screen. This time the Create Panorama button is now enabled and a handful of new tabs also appeared. Clicking on the button or on the tab will take you to the same screen.
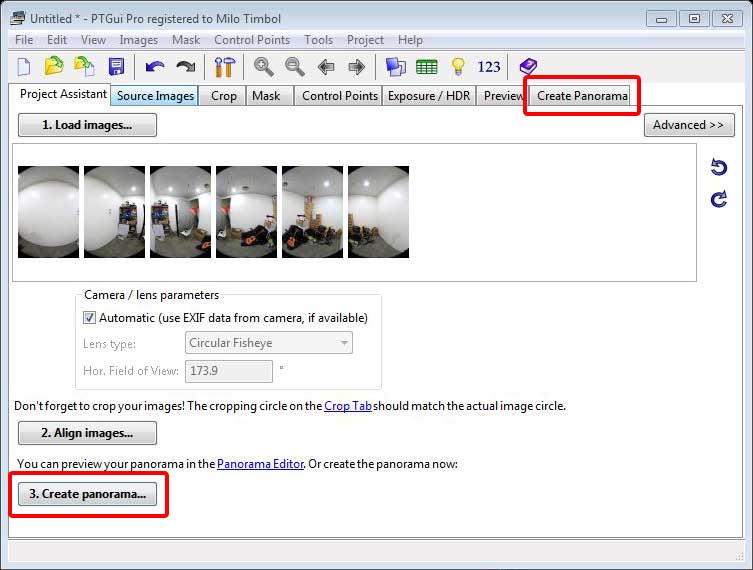
Just accept the defaults. Click Create Panorama
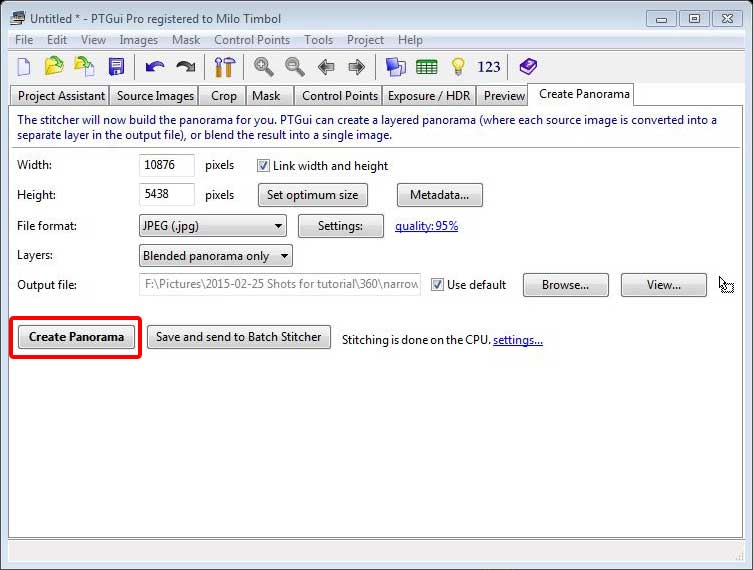
A progress bar will appear.

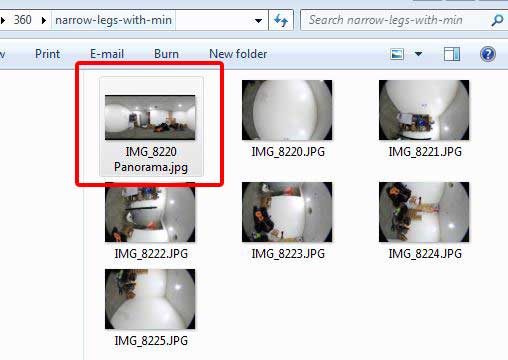
When it's finished a new file will appear in the folder where your images are. This file is called an equirectangular image, it has a 2:1 aspect ratio. Looking at it using a image viewer wont make much sense since the top and bottom sections are distorted. It will only look nice when you put it into a 360 panorama player like krpano.
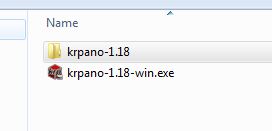
Next thing we need to do is remove those black holes on the up shot (zenith) and down shot(nadir). For that we'll need a tool to convert the equirectangular images to cube faces. The one I use is Krpano Tools. You can download it here. You'll get an exe file. Just run it and it will ask where you want to extract the files to. After extracting a new folder will appear with the version number of krpano. At the time of this writing the most current version is krpano-1.18. You will need to buy a license for this but you can still use it without one. Without a license the images will have watermark all over it.
Copy the equirectangular image generated by PTgui inside this folder. I renamed the file equirectangular.jpg. Now drag this file to the batch file called Convert SPHERE to CUBE droplet.bat
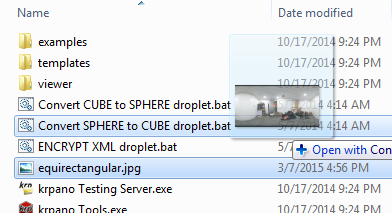
A black screen will appear showing the progress of the conversion. When its done just hit enter to close the window. There will now be 6 new files inside the same folder. These represents the up,down,lef,right,back,front shots.
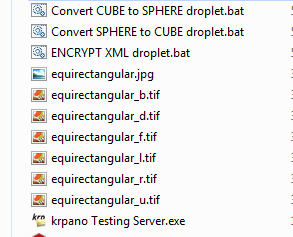
Now what you will need to do is edit the up and down shots in photoshop. You will also need to edit the other cube faces, the shadow of the tripod will be in the back shot so we will edit this too. When removing the tripod out of the scene I use the patch tool most of the time. The way it works is you select an area you want to patch to and then another area where to patch from or copy from.
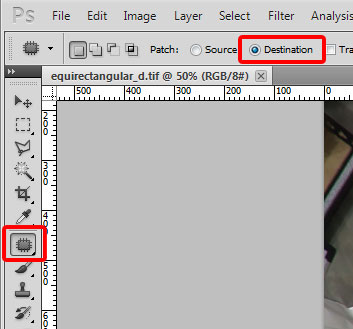
Open equirectangular_d.tif in photoshop. On the menu select the Patch Tool, then tick the Destination radio button.
Drag an area around the tripod and its shadow.
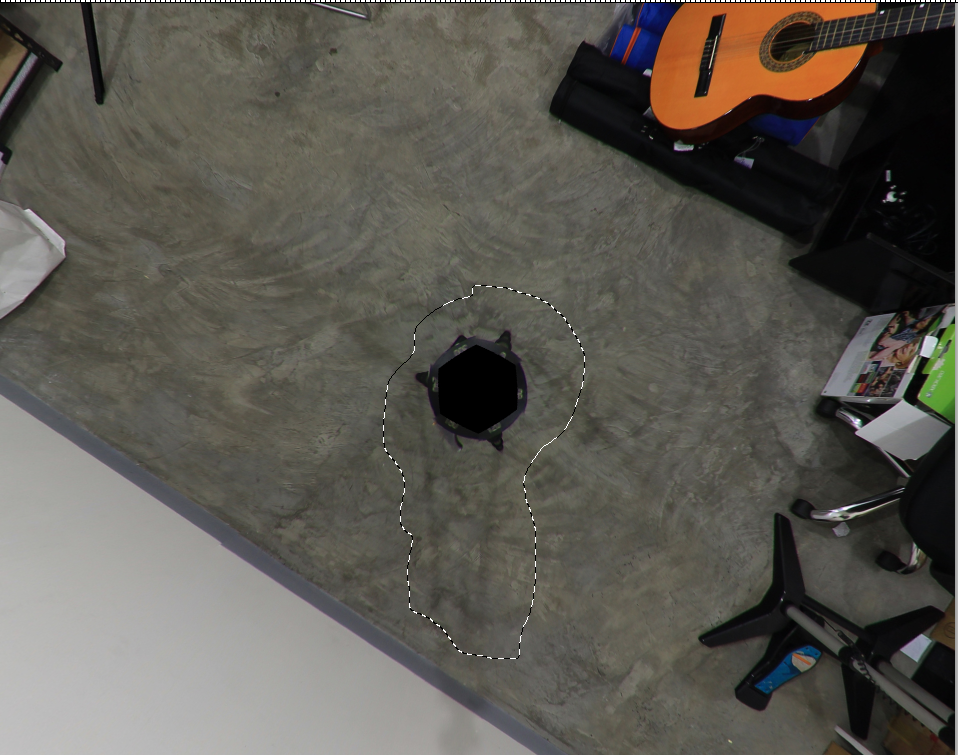
Tick the Source radio button this time and then drag the selection to an area on the floor you want to copy from. When you let go of the mouse left button the area should now become patched.
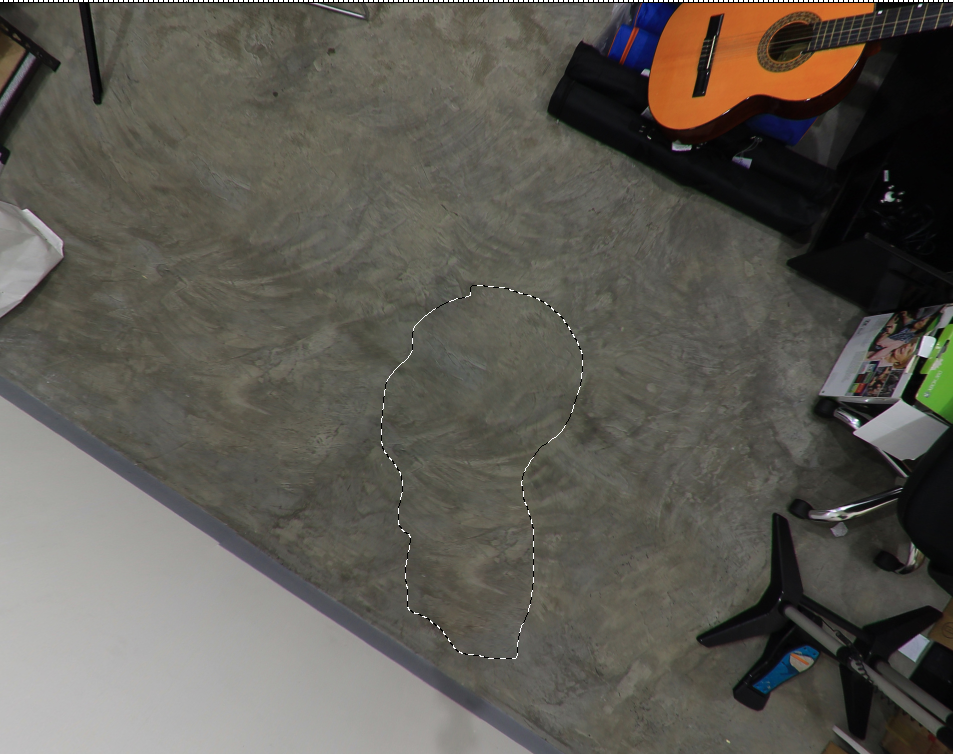
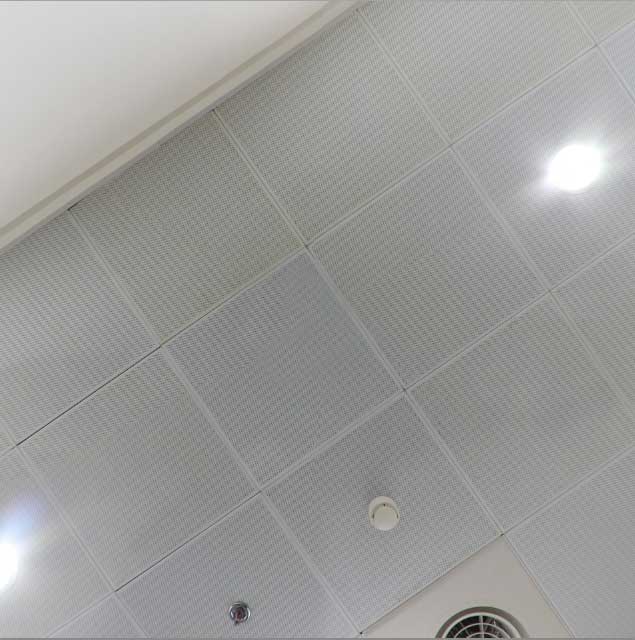
Repeat the process until you get rid of all the tripod shadows, dirt, other unwanted items. There are cases when you can't use patch, actually on our up shot in this tutorial it's hard to get rid of the black hole cleanly because of the dot patterns. I should have shot shot the ceiling entirely (#7 position, camera facing upward) to get rid of this problem.
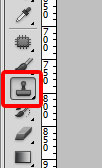
For cases where patch won't work, use clone stamp tool. The way it works is similar to patch but it's more like a brush tool. After selecting clone stamp on the menu hold Alt on your keyboard and click on an are you want to copy from, then brush the area you want to remove. You have to repeat this over and over until you can make this look natural.
This is the result. It's not the best editing but it's enough to remove the black hole.
After editing all the cubefaces we need to turn them back into an equirectangular image. So select the 6 images and drag them to Convert CUBE to SPHERE droplet.bat this time.
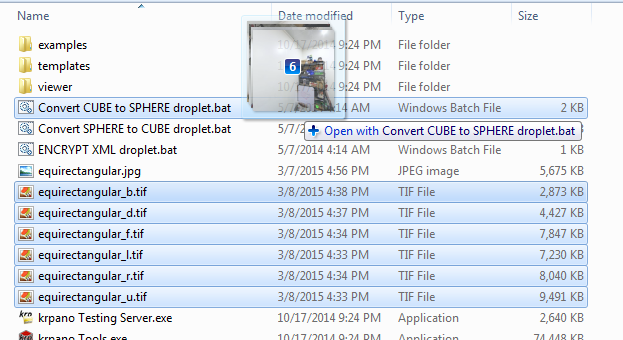
A file named equirectangular_sphere.tif will be created. This is the file we will use to create the interactive version.
You can still do more with the image like sharpen, add saturation, fix misalignments. but for this tutorial we won't do that anymore.
How to convert a 360 panorama to a virtual tour
The video above is an updated tutorial on krpano. The instructions below are outdated. Please just watch the video and ignore the section below.
You've already encountered krpano when we converted the equirectangular image to cube faces. This is the same software we will use to make a 360 virtual tour.
Why Krpano? Here are some reasons to use krpano.
- It's highly customizable. You can create your own skin and animations.
- It's html 5 compatible, it can run on devices that dont support flash like on an ipad
- It's easy to create a tour using the droplets
- You can create offline files for mac(app) and pc(exe) (atleast on the older versions).
I haven't tried other software so I can't recommend others but feel free to explore other options. For this tutorial I'll just use krpano
To show you how to create a virtual tour I will use 3 scenes from a shoot I did few years ago. A beach shot, pool, and restaurant. My goal is to connect all three with arrows.
First thing to do is place all the equirectangular files in the same folder as krpano.
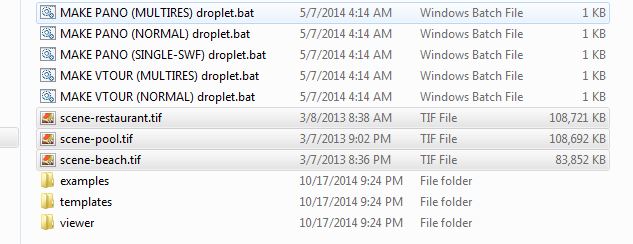
Select all 3 files and drag them to the Make VTOUR (multires) droplet.bat file.
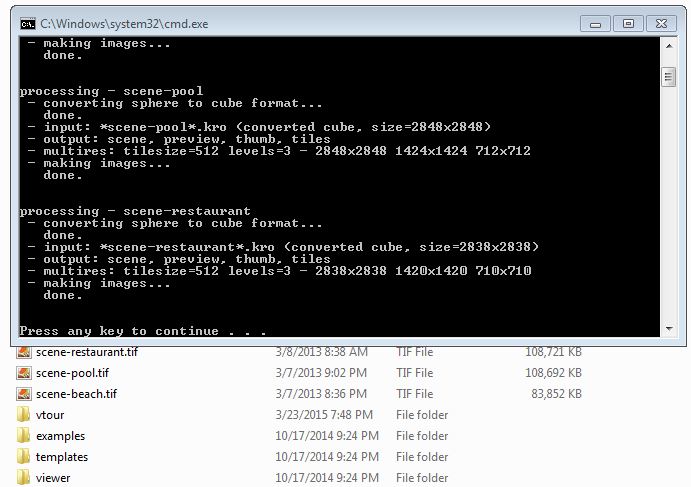
A black window will appear and will show you the progress. When it's done you will see "Press any key to continue . . .". A new folder named vtour will also have been created. Go inside this folder.
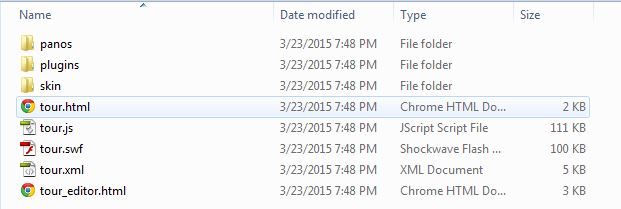
To open the virtual tour just open tour.html. You can already view the virtual tour but the scenes are not yet connected to each other. In order to access them you need to bring up the thumbnails panel by clicking on the Toggle Thumbnails button found on the bottom left portion of the screen.
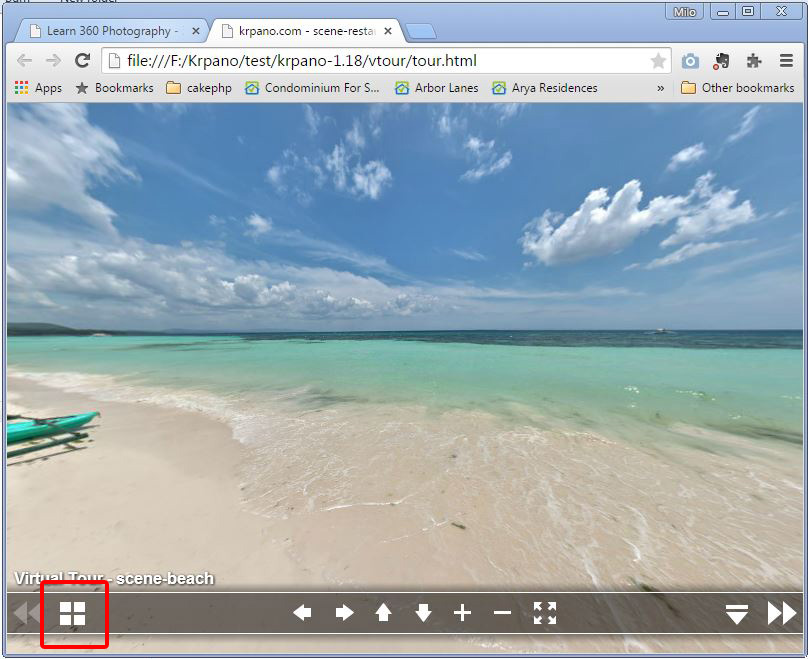
As you can see there are 3 scenes you can choose from. Clicking on the image will take you to that scene

To connect the scenes open tour_editor.html. This will open a similar window to the previous one but this time with more options
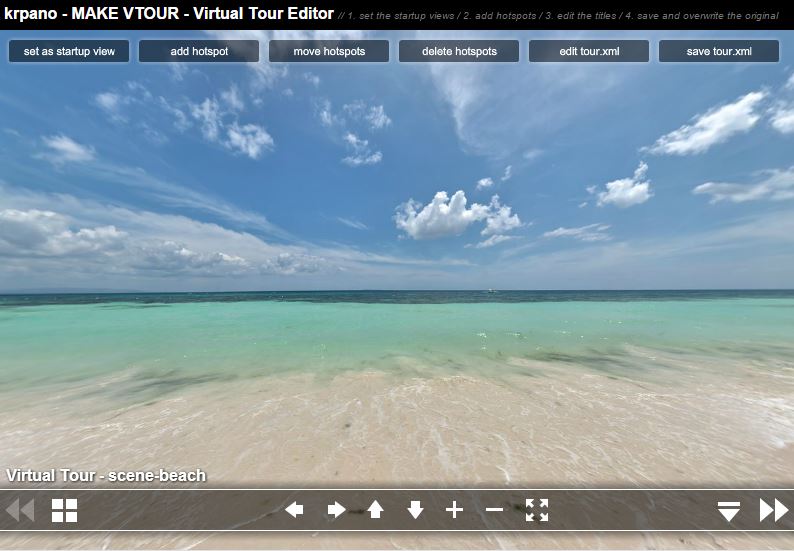
To add an arrow click on Add Hotspot
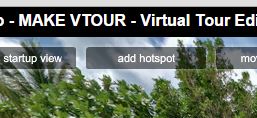
An arrow will appear. Drag it to the position you like to connect to. Click Done when you're happy with the arrow's position
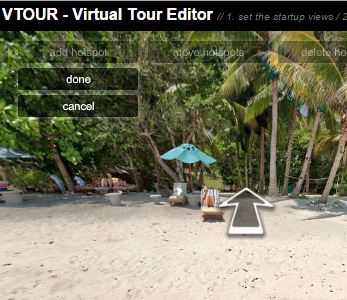
You will then be given options what scene to connect to click on the thumbnail and then click Done. When you click on the arrow you will now be taken to the scene you connected to. Repeat the steps until you've connected all the scenes.
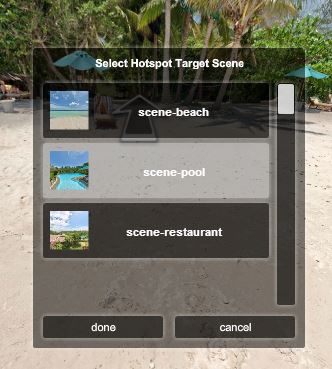
When you're done connecting all of them click save tour.xml.
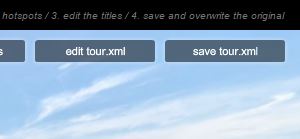
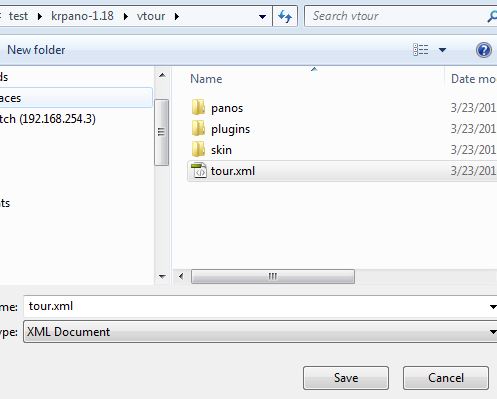
A dialog box will open. Navigate to the folder where the virtual tour files are. Select tour.xml and click save.
When you open tour.html you will now see the arrows. I embedded a sample below.
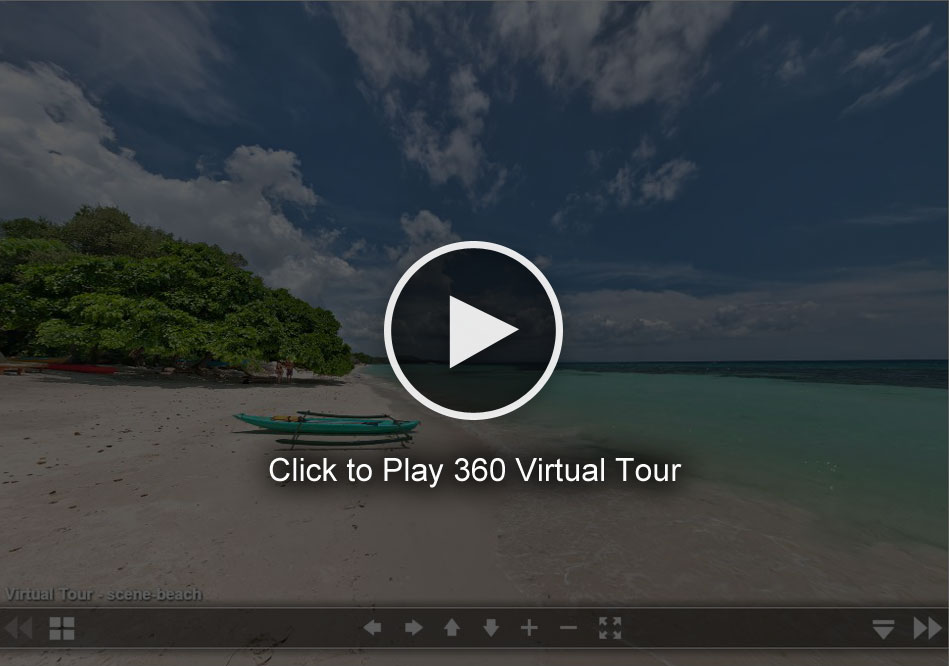
You will notice that the controls are different than the previous examples I've shown. This is because this is the default control mode of krpano. To change the default you will just need to edit a few lines of code in the xml but you can already change it by right clicking on the screen and clicking Change controlmode. Doing this will switch the control mode to the google street view type of control.
That's it you should already know how to shoot 360 panoramas and create virtual tours.
I've given so much free stuff already so now is the time to sell you something. Well actually I don't have anything to sell yet but if you're interested in learning advanced techniques (like how I made the scene below more alive by bringing out the clouds and details in the rock formations.) then sign up below to express your interest. If I get enough people interested I might just create that tutorial. It could be in ebook or membership area in this website.
